CONTROLLING OCULUS
This section covers remotely controlling Oculus from a PC on the local, or on far-distant network, using just a web-browser. Some configuration and calibration is carried out through this interface, as well.
CONNECTING FROM A REMOTE PC
To access the PC client interface from a remote PC, fire up your favorite web browser. It needs to have Adobe’s Flash plugin 10+ installed. Enter the URL in your web browser address bar. The url takes the format:
http://ip-address-or-domain-name:port/oculus/
replace ip-address-or-domain-name with the appropriate text (see section on network setup for more details). Replace port with the default port 5080, or other if you chose a different port in setup.
For example:
http://192.168.0.111:5080/oculus/
Once you got it right, you should be connected to Oculus and be facing the login screen. Login using the administrator username and password that you created in setup.
Once logged in, you should be looking at the command console page.
COMMAND CONSOLE WEB PAGE
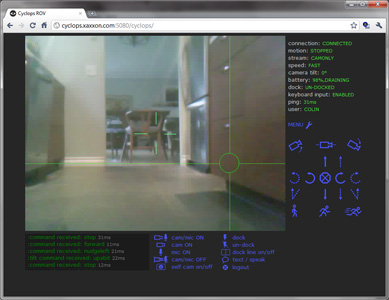
This page is comprised of 5 sections:
- Top left is the main video window.
- To the right of the video window, on top, is the status section. This section lists various statuses of the system, which are updated in real-time by Oculus.
- Below that, to the right of the video window, is the mouse controls area. When you hover the cursor over each icon in this area, it will show a description of what each does, underneath. And under each description, if available, there is shown a keyboard shortcut.
- Lower left is the communication feed, primarily listing detailed feedback from Oculus, when you send commands.
- Lower right is a set of controls for starting and stopping video, docking, and some other commonly used commands.
Extra features and advanced commands are accessed by hitting the “MENU” link.
NOTE: you can also access the main controls page on screen of Oculus itself, by hitting “launch controls” on the Oculus Server page. This is a useful option for calibration, particularily of the mirror tilt, as described below.
CALIBRATION
CAMERA TILT
After unboxing and setup, you probably won’t be able to do much of anything without calibrating the camera tilt, because the default values may be all wrong. To do this, first turn the video on by clicking “cam on.” Then hit “MENU” from the main controls page, then under the “settings” section, click “camera tilt settings.”
The “max clicksteer angle” doesn’t need to be tampered with at this stage. The horiz/max/min angles are what you’re trying to define. Valid numbers range from 0-180 (corresponding to degrees of tilt of the mirror servo). Start by entering a value of, say, 90 in the “Test at position” box and click “go.” Keep repeating this process until you’ve found a more-or-less horizontal position, and maximum and minimum tilt positions that don’t quite cause the mirror to actually hit the physical limit stops (as a guideline, minimum is approximtely -10 from horiontal, and maximum is +20). Once you’re satisfied, make sure the values are in their corresponding boxes, and click “send values.”
DRIVING SETTINGS
To access the driving settings calibration tool, click “MENU” then “driving settings.”
STEERING COMP should be set first (if required). Drive Oculus forward and backward on smooth, level floor. It doesn’t have to be perfect, but if you find that there is a noticeable, annoying drift to the left or the right, enter a compensation value (start small at first). Click “send values” then test some more, and repeat as necessary.
NOTE: the motors may break in over time, you may find you have to adjust the steering comp value once in a while.
SPEED OFFSET values set the “slow” and “medium” speeds. Valid numbers range from 0-255, with 255 being maximum speed. The default values are probably OK initially, though you might later want to increase the “slow” speed a bit, if you find you don’t have enough low-speed torque. NOTE: docking uses “medium” speed, so if you change that, make sure docking still works.
NUDGE DELAY determines how far to steer when issuing a “nudge” command. The default value is likely OK.
MAX CLICKSTEER and MOMENTUM sets the horizontal accuracy of where Oculus points when you mouse-click in the main video window.
For “max clicksteer ms,” enter the time, in milliseconds, for Oculus to steer from the center to the very left or right edge of the screen. To determine if you’ve got it right, click on an object within view that is right at the left or right edge of the screen. If Oculus steers it to almost right in the center of the crosshairs, you’re set.
The “momentum x” setting usually takes a fractional value between 0-2. Set it higher for heavy rigs that fall short of the mark at targets closer to the horizontal center of the video window.
For vertical clicksteer accuracy, you can tweak the “max clicksteer angle” setting under “camera tilt settings.”
AUTO-DOCK
The visual docking system needs to be calibrated, with Oculus manually placed square and centered right in front of the dock, as shown in the diagram below.
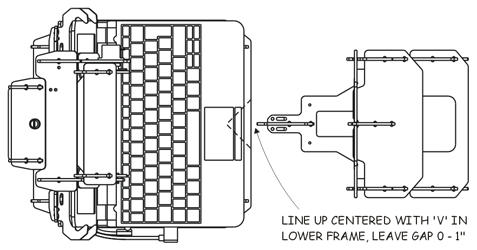
Calibration placement
Once it is in position, follow these steps:
- Turn video on
- Make sure room is brightly lit, with even light (no shadows) cast on the dock graphic.
- Tilt camera to its minimum position, so it’s looking down as low as it goes
- Click “MENU” then “calibrate auto-dock”
- Click somewhere within the white area of the dock graphic.
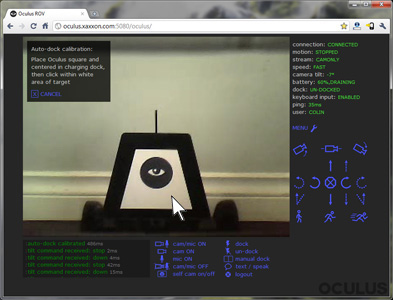
Auto-dock calibration
And you’re done—you should only have to do this once. This writes the specs of the dock graphic to oculus_settings.txt
MANUAL DOCK LINE
In the rare event where you need to dock manually (eg., if someone has scribbled all over the dock graphic with a black marker), it helps to have the manual dock-line lined up with the center of the dock. Follow these steps:
- Place Oculus and the dock in the same position as described above
- Turn video on
- Click “MENU” then “calibrate dock line”
- Click in the video window, to line up the center yellow line with the “spire” at the top of the dock
- Click “save”
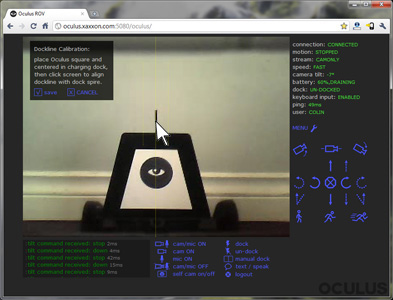
Dock line calibration
DRIVING
To the lower right of the video window, is the mouse controls area. When you hover the cursor over each icon in this area, it will show a description of what each does, underneath. And under each description, if available, there is shown a keyboard shortcut.
Rather than explaining here what each control does, it’s best that you just try each one out, and see for yourself. It takes a bit of practice if you’ve never driven a video ROV before, but you’ll be a master in no time.
STATUS DESCRIPTIONS
To the right of the video window, on top, is the status section. This section lists various statuses of the system, which are updated in real-time by Oculus:
CONNECTION: Describes state of your connection to oculus. Should generally say “connected” or “passenger”. If it doesn’t, try reloading the web page.
MOTION: Let’s you know if the wheel motors are moving or not. If it says “disabled,” it usually means you’re parked in the charging dock. Once you click “un-dock,” motion will be enabled.
ROV STREAM: Indicates if Oculus is transmitting a video and/or audio stream, or stopped.
SELF STREAM: Indicates if remote client browser is transmitting a video and/or audio stream through Oculus, or stopped.
SPEED: Indicates what wheel speed Oculus is set at.
CAMERA TILT: Indicates what angle the webcam periscope upper mirror is at.
BATTERY: Shows the latest charge status of the battery. It updates every few minutes. To update this status immediately, go to “MENU” > “battery status refresh”
DOCK: Indicates whether Oculus is parked in the charging dock or not.
KEYBOARD INPUT: Indicates if keyboard input is enabled or disabled.
PING: An indication of network connection speed. It is the round trip time, in milliseconds, for a message to be sent to Oculus and a response to be received. The longer this time is, the slower the controls will respond. Generally things will work nicely as long as ping averages less than about 300ms.
USER: Indicates who is logged in.
VIDEO AND AUDIO STREAMING
Under the video window are a set of controls for starting and stopping video and audio streaming on Oculus. To change the video quality setting, go to “MENU” and select one of the video quality options, or set a custom option.
If you’ve got a slow connection and are noticing significant video lag, try turning the sound off (ie., select “CAM ON”), this will give you a boost in available bandwidth.
TWO-WAY VIDEO CHAT
With Oculus streaming video and audio set to ON, if your remote PC has a webcam you can enable two-way video chat by hitting “SELF CAM ON/OFF.” If this pops up a Flash dialog box that says “… requesting access to your camera and microphone”. Click “ALLOW.” You should see your image showing in the lower left corner of the video window.
Notes about this feature:
- The monitor of Oculus should be ON for this feature to be of much use. If you haven’t enabled the monitor to be “always on while on battery” under power settings, you can remotely turn the monitor on by hitting “MENU” and “MONITOR ON.” You might have to keep doing this periodically.
- Excessive volume will cause echo issues. You might have to experiment with this and dial-in the volume settings on Oculus, and your remote PC. For best results, use a headset on the remote PC.
- Results will vary between laptops, their microphone and speaker qualities, and mounting locations within the laptop. If you’re really serious about 2-way video chat, it might be beneficial to add an external mic.
DOCKING WITH THE CHARGER
To park in the charging dock when not in use, drive within a couple meters of it, make sure it’s showing in the video window, select “DOCK,” then press “GO.”
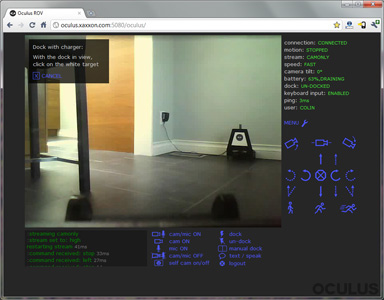
Auto-docking start
Oculus will begin the process of parking itself. It may back up and try again if it docks and doesn’t find a charge, or if it gets in too close and finds itself too far off-target.
It will pause every few moments while docking, to analyse the webcam image. If the view of the dock is ever blocked while it’s doing this (for example, if an absent-minded cat walks between), it may get stuck in a pause for a long time, then show a “target lost” message in the communication feed. If this happens, just try again.
To cancel the auto-docking process at any time, select “CANCEL” or “STOP”.