SETUP
This section walks through the procedure of getting up-and-running with a fresh server software installation on the laptop/netbook you plan on mobilizing, and attaching and configuring the Oculus hardware. Don’t attach the USB cable just yet, or mount your laptop in the frame (you’ll want an unfettered view of the screen and comfortabe access to the keyboard for software installation).
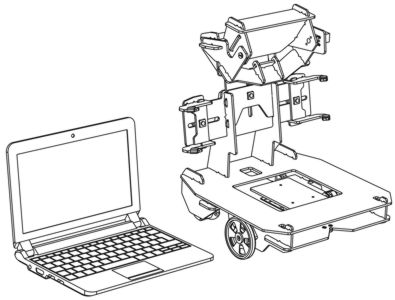
ASSEMBLY
- Assemble the periscope assembly to the frame with the thumbscrew and nut provided.
- Attach the periscope servo cable to the servo cable extension, assuring that the lightest-colored wires of each line up (eg., white to white, or white to yellow).
- If necessary, plug the servo extension cable into the Oculus controller board, with the light colored cable (eg., white) facing to the center of the board.
- If necessary, plug in the USB cable into the controller board.
If you have a preconfigured package and are using it for the 1st time, you can skip ahead to mounting laptop in frame. The recommendations under operating system tuning notes has already been done. Basic calibration has also been done, but you may fine you need some fine tuning.
SOFTWARE INSTALLATION (Windows)
(For LINUX specific install info, see linux notes)
Java runtime 32-bit is required. If you don’t have it, get it here. The 32 bit version is required, even if you’re running 64 bit Windows. You may have to set your PATH to point to where java is installed (usually something like “C:\Program Files (x86)\Java\jre6\bin”). For info on how to set your PATH environment variable, see here.
Flash browser plugin v10 or higher is required for the server. If you don’t have it already, get it here.
Download the Oculus full win32 software install package ZIP file from here. Unzip the file so the ‘Oculus’ directory and its contents is on the root of laptop’s hard drive (eg., C:\Oculus ).
Next, with the Oculus frame sitting next to the laptop, and the laptop connected to the internet, connect the USB cable.
DRIVER INSTALLATION (Windows)
When you connect the cable, Windows should initiate the driver installation process. On Windows Vista or 7 the driver should be automatically downloaded and installed (if this fails for some reason, download and install appropriate drivers from here).
On Windows XP, the Add New Hardware wizard will open:
- When asked “Can Windows connect to Windows Update to search for software?” select “No, not this time.” Click “Next.”
- Select “Install from a list or specified location (Advanced)” and click “Next.”
- Make sure that “Search for the best driver in these locations” is checked; uncheck “Search removable media”; check “Include this location in the search” and browse to the “\Oculus\FTDI USB Drivers” directory. Click “Next.”
- The wizard will search for the driver and then tell you that a “USB Serial Converter” was found. Click “Finish.”
- The new hardware wizard will appear again. Go through the same steps and select the same options and location to search. This time, a “USB Serial Port” will be found.
You can check that the drivers have been installed by opening the Windows Device Mananger (in the Hardware tab of System control panel). Look for a “USB Serial Port” in the Ports section; that’s the Oculus microcontroller board.
Now that software and drivers are installed, you can mount the laptop in the Oculus frame.
MOUNTING LAPTOP IN FRAME
Loosen the 4 adjustment knobs, and extend the wings and the vertical periscope sliders to their maximum position.
- Place the laptop in position, and reconnect the power and USB cable if necessary.
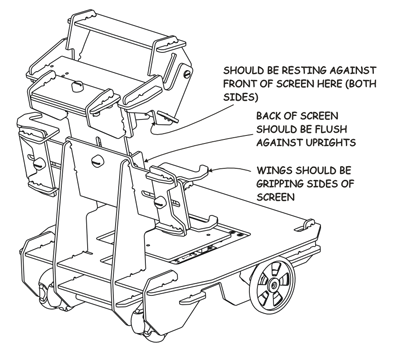
- Move the adjusting slides into position, be careful to center the laptop within the frame so that the webcam at the top of the screen lines up with the center of the lower mirror.
- Don’t worry too much about the vertical position of the mirror now, you can take care of that in the next step.
- Move the periscope assembly forward and back so that the back of it is resting firmly against the front of the mirror.
- Tighten all the adjustment knobs. Don’t over-tighten, finger tight is OK.
With the hardware in place, you’re ready to run the Oculus server software for the first time.
STARTING THE SERVER (Windows)
From within the “Oculus” directory, run “OCULUS_START.bat”. A console window will open and the server will start. After a few moments, your default web-browser will open, showing the server initialize dialog.
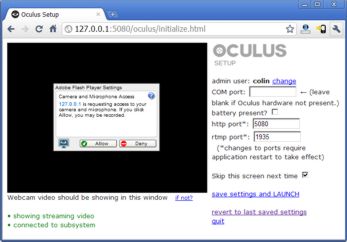
Server initialize dialog
Check if the video/webcam is streaming: if there is no image showing, there is probably a Flash dialog box that says “127.0.0.1 is requesting access to your camera and microphone”. Click “ALLOW.” You should see live video in the window.
- Right-click in the video window and choose “Settings”.
- Check the “Remember” box.
- Go to the microphone and camera tabs, and double-check that the correct cam and mic are selected.
- Under the microphone tab, make sure the “reduce echo” box is checked. Mic volume should be as high as possible without creating too much echo/feedback.
- Adjust the vertical position of the periscope so that the top and bottom edges of the lower mirror are centered in the video frame
- Enter an administrator username and password.
- Make sure the “battery present” check box is checked (unless you’re testing the software on a desktop PC)
- Leave http port at 5080 and the rtmp port at 1935, unless you want to change them from the default (more info on this below).
- Make sure the “skip this screen next time” checkbox is checked.
- Finally, click “save settings and LAUNCH.”
NETWORK SETUP
Network setup of Oculus involves a bit of know-how about IP addresses and wifi routers; it should be simple if you have some experience already. This section doesn’t go into the nitty-gritty details, as there are already good resources on the web to learn from.
To be able to access Oculus from a remote PC on your local network, you need to know the correct address to point the browser to. By default, the IP address will likely be dynamic; that is, it is subject to change periodically. It will make your life simpler to set the IP address as static.
To access Oculus from a remote PC outside your home or office network, you’ll need to setup your wifi router to forward ports 5080 and 1935 (or to different ports if you like, just remember to change them in the initialize dialog, as described above, and restart the application). Port 5080 is for the Apache Tomcat web server, and port 1935 is for the RTMP (real time messaging protocol) service used by Oculus to stream audio and video, and send and receive commands in real time.
A good place to start looking for information on port forwarding is here: http://en.wikipedia.org/wiki/Port_forwarding. Once you have this setup, you no longer point to Oculus’s address directly, you should point at the router’s address. Note that some firewalls block pretty much all ports, so you may not be able to connect to Oculus if the remote PC is on a heavily locked-down network. The current version of Oculus software offers no solution for this (using dedicated ports allows maximum real-time responsiveness).
To avoid having to remember the numeric IP address all the time, a good tip is to use the DynDNS free domain name service (or similar). DynDNS is a good one because its so popular that some wifi routers have built in support to update it automatically if your internet service provider changes your IP address.
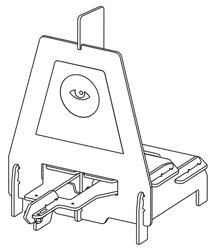
POSITION THE CHARGING DOCK
Oculus uses computer vision to automatically dock itself into the charging dock, and there are a few dock placement factors to know about:
- Place it on the floor, near an AC wall outlet.
- Floor should be level.
- Floor should be smooth and not carpeted, for best results (or at least on fairly smooth, hard carpet).
- It’s best to place it with its back against a wall or some other immovable object, that won’t be able to be nudged by Oculus when docking.
- Oculus needs a clear view of the black and white graphic, to dock itself automatically—it’s best for the dock to be placed in an evenly lit area, ideally such that Oculus doesn’t cast a harsh shadow on the graphic when it gets close
- When un-docking, Oculus automatically backs straight out about 3/4 meters, so make sure there is adequate clearance.
OPERATING SYSTEM TUNING NOTES (Windows)
Windows needs a few tweaks to be able to act as a real time operating sytem, suitable for robotic control.
- Disable sleep/hibernate, while plugged-in and running on battery. If you don’t, you won’t be able to access Oculus while the system is sleeping.
- Under power settings, set monitor ON AT ALL TIMES while running on battery. If nothing else, the monitor will shed a bit more light on the situation, and it will ensure the monitor will be ON if you’re using 2-way video chat/telepresence. While plugged in, it’s OK to allow the monitor to turn off automatically after a short delay.
- For maximum performance, the web-browser tab running the server page always needs top focus (ie., it has to be the top-most window, no other applications can have higher priorty). If it doesn’t, there may be a significant performance lag in video frame-rate, and control responsiveness. One of the biggest culprits of focus-stealing by the operating system is pop-up reminders in the system tray (eg, for java updates, system updates, and scheduled tasks). These might only come up every few days or weeks, but if you want to leave Oculus running and available for log-in while you’re away on vacation, these reminder pop-ups could be a pain. Disable as necessary.
- For maximum performance, close all other instances of the flash plugin (ie., no other web-pages should be open that could have a flash component in it).
- Auto-start on reboot: put a shortcut to the “OCULUS_START.bat” file in the “Startup” folder in the start menu, and make sure no manual login is required on system startup (see here for instructions on that). This way, if you remotely reboot Oculus for whatever reason, the server will start up automatically and you’ll be able to re-connect. Reboot the system a couple times to test your settings.
- Setting Oculus to reboot the computer periodically really helps with long-term availability (if you want to leave it running for weeks/months). In the remote-control-web interface, goto menu > server settings, and set “reboot every 48 hours” to YES.
That’s it for this setup section, but technically, you’re not quite finished. Some calibration needs to be done, which is discussed in the next section.