NOTE: if you’re running the recommended PC hardware, you may want to skip this entire section by installing from system image (you won’t learn as much compared to doing it yourself, but it will be faster). See instructions here.
Step 1 – Install Xubuntu
We use the Xubuntu flavour of linux because it’s well supported, lightweight, and runs with no monitor attached without complaining. It’s also supported by ROS. Other Linux OS systems should work OK, but we might not be able to help out with compatibility problems.
Get Xubuntu 16.04 LTS 64-bit OS from here.
During installation, set hostname, username and password as to your preference. When given the choice, set to LOGIN AUTOMATICALLY.
TIP: If you don’t need any specific language packs, Ubuntu installation goes much faster if you disconnect from the internet before installing.
Step 2 – Connect to Wifi
Connect to your preferred wifi network, set to “automatically connect when available.”
Normally you’ll want to choose a specific IP address. You can set a static IP manually in the connection setup IPv4 settings, or reserve a particular IP for the wifi card’s MAC address on your wifi router.
Step 3 – Setup Headless Operation
Running Linux “headless” (ie., without monitor attached) can be a pain until you have all the settings right. Even after completing this section, don’t put that monitor and keyboard away until you’ve tested power cycling a few times and are sure things are working the way they should.
REPOSITORY SETUP:
Change your package repository reference to ‘Main’ or the United States, if it’s set to a different location, using the “Software and Updates” GUI tool under settings. This seems to help things from breaking when installing and updating software.
If you haven’t already, open a terminal and do:
$ sudo apt get update
Since the OS will be operating headless, you’ll need remote clients. Install sshd for remote console connection:
$ sudo apt-get install openssh-server
test with:
$ ssh localhost
You’ll also need a VNC server for remote desktop:
$ sudo apt-get install x11vnc
Run the server by entering:
$ x11vnc -display :0
DISABLE POWER MANAGEMENT:
Any screen blanking and power saving functions can wreak havok with accessing the desktop remotely.
Go to the ‘Light Locker Settings’ GUI tool and turn everything to OFF, set sliders to 0 minutes/never.
Go to the ‘Power Manager’ GUI tool and un-check ‘Monitor Power Management Control’ and go through the various tabs and set all the sliders to 0 minutes/never.
ENSURE BOOT DOESN’T WAIT FOR KEYBOARD INPUT:
If the system doesn’t shut down cleanly, sometimes the Grub boot manager will wait for a menu selection before booting the OS. To avoid this, use a text editor to open the file: /etc/default/grub and add the line:
GRUB_RECORDFAIL_TIMEOUT=0
Then run
$ sudo update-grub
Also, in the case of disk checking on startup, you’ll want the system to repair any problems automatically. Edit the file /etc/default/rcS and find the line containing: FSCKFIX=no
Uncomment it if necessary and change it to read:
FSCKFIX=yes
DISABLE “System program problem detected” POPUPS:
These can popup occasionally when an application crashes, asking if you want to send a report to the developers. Since we’re running headless, you’ll want to disable them by editing the file /etc/default/apport and change the line:
enabled=1
To read:
enabled=0
DISABLE AUTOMATIC SOFTWARE UPDATE:
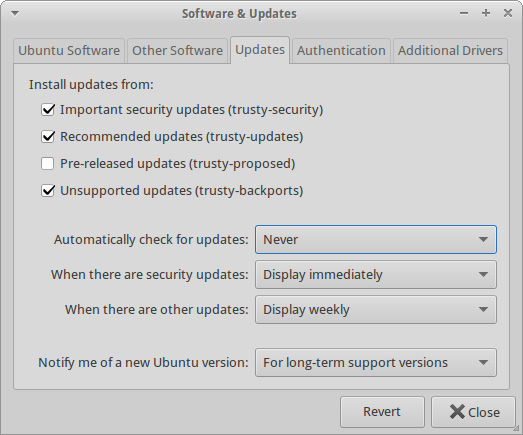
In the menu go to ‘Settings > Software and Udates’ and click on the ‘Updates’ tab. Switch ‘Automatically Check for Updates’ to ‘Never’:
It should be OK to work on the system remotely from here onward. Try rebooting a few times to see if the system comes up OK and connects itself to wifi. You might have to plug in the monitor + keyboard again once or twice to get settings right.
Step 4 – Install Prerequisite Software
Install required dependencies and packages:
$ sudo apt install libdc1394-22-dev v4l-utils
openjdk-8-jdk-headless libswscale-dev nasm
pkg-config libasound2-dev
AVCONV:
The latest versions of Oculusprime Java Server uses avconv to capture the webcam and microphone.
To install avconv, compile the latest stable version of Libav from source, available from www.libav.org.
Unpack the downloaded archive. From within the created folder, do:
$ ./configure
$ make
$ sudo make install
Step 5 – Add User to Dialout Group
USB ports are only available to root by default in Ubuntu. To give yourself access as a regular user, enter:
$ sudo adduser user_name dialout
Substitute “user_name” with your username. NOTE: reboot is required for this to take effect.
NEXT: Disable Camera Auto Focus